|
Play in your browser! - Math Free, no sign up! |
Learn by Java!
|
|
Play in your browser! - Math Free, no sign up! |
Learn by Java!
|
Manual Contents
Top . MacOS . Hungry Frog . 49er Gold Rush . Jellyfish Fun . Web Games . Freeware . Buy!
49er Gold Rush Games for Windows
Software requires 32 bit Windows 95/98/NT and corresponding Microsoft .dll files which are part of the 32 bit Windows 95/98/NT systems, 16 MB RAM, a Pentium processor and an SVGA video card with 1MB (2MB recommended) of memory capable of displaying 256 colors (1000s recommended).
In the 49er Gold Rush games you are a 49er playing against either a computer opponent or another person. Your goal in the game is to mine more gold that your opponent. You mine gold by turning over rocks to discover gold underneath, but you can't just turn over any rock. Before you can successfully mine gold from under a rock, you have to turn the rock over with the correct "Tool". You pick your Tool from one of the Mining Stores at the bottom of the screen. If your Tool matches the type of Rock, then you can take the gold under the rock (your 49er Miner friends will deliver it to you on the left side of the game screen).
If you try to turn over a rock with the wrong tool, your tool will break and you will have to take a rest and go get a new one, but first you opponent will get a chance to mine while you are going back to the tool store.
You can think of the game as a wild variant on the classic "concentration" card game.
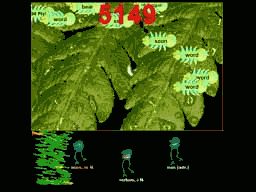
The following screen shot shows the 49er game layout. In the screen shot you see the following items important in game play:
: Stream Bed : Rocks : 49er Miners : Names : Scores : Current Player : Mining Stores : Tool :
Top . MacOS . Hungry Frog . 49er Gold Rush . Jellyfish Fun . Web Games . Freeware . Buy!
The Stream Bed is where the Rocks lie (upper right of screen). When a level first begins, you can see under all of the rocks for a few seconds before the first player gets a chance to select a Tool from the row of Mining Stores. For example, in the above screen shot a level is just about to start and the 5 Rocks for that level are shown uncovered. The player named "Human" is ready to start to play first (lower left of screen). Human has already found some gold and a 49er Miner friend is delivering the last load to his stockpile (upper left of screen). The "Tool" in the first Mining Store is shown (the shop door is open). You can see that this tool matches the two leftmost top and bottom rocks.
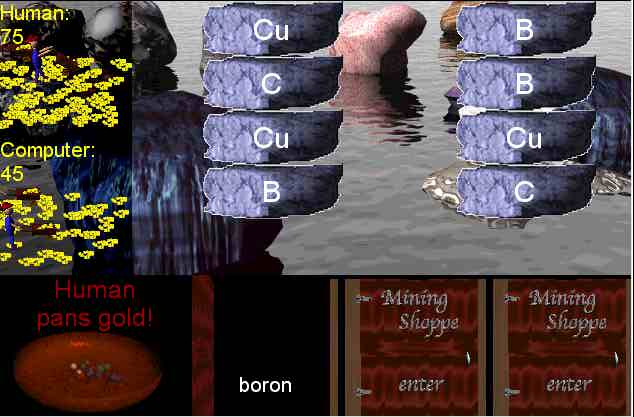
In the above example, after a few seconds the names on the rocks will go away and the first player (Human) will then have a chance to start panning (mining) for gold under the rocks. If Human knows that his "Gallus, -i M." tool matches the "a Gaul" rocks AND remembers which rocks are "a Gaul" rocks, then he'll click on those rocks with that tool selected and collect all the gold under those rocks. Human's opponent will be watching closely, and if Human picks the wrong rock, his opponent will see what kind of rock it is and can select the correct tool for his turn...
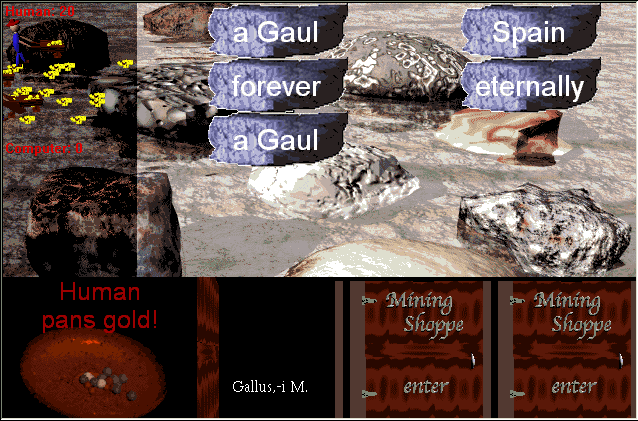
For example, in a screen shot from another game where it is later in the game, both players have collected more gold. In the screen shot below, the player named "Human" has just correctly selected the "Greek" rock which matches his "Achivus, -a, -um" tool, and his 49er Miner friends are delivering his gold. His computer opponent's 49er Miner friends are finishing up their delivery of gold from the previous turn (the 49er Miners under the Computer's score tally).

When the gold has been mined from under all of the Rocks, the next day begins and you have a whole new set of rocks and tools. If you are playing against another person, the winner from the previous day starts first. If you are playing the computer, you always get to start every level first.
Top . MacOS . Hungry Frog . 49er Gold Rush . Jellyfish Fun . Web Games . Freeware . Buy!
In both the above examples, the player named "Human" (in fact a human) is playing the computer. If you are alone, you can always play the computer. You can also change the intelligence (skill) of the computer from the Options menu. If the computer is winning too easily, make it dumber! It's doesn't mean anything bad if you don't play against the smartest computer. If fact, the computer sometimes knows things you don't, because it knows secrets about the stream bed... some might call that cheating...

Top . MacOS . Hungry Frog . 49er Gold Rush . Jellyfish Fun . Web Games . Freeware . Buy!
Just double click on the application icon (the 49er Miner icon) to start the game (use Windows Explorer to explore the CD or your hard drive if you copied software to your hard drive). If you have not yet registered the software, you must enter your name before you can start playing.
For example, to play 49er Gold Rush Latin, double click on the application "49er Gold Rush Latin.exe" in the "49er Gold Rush(tm) Latin" folder on your CD.
After a second, the game will present you with the player name dialog box. You can enter just your name and leave the "Computer" name as "Computer" to play against the computer, or you can let your friend enter his or her name and then you will play against each other.
The rooster will then crow, and you get your first look at the Level 1 stream bed, and the game begins.
49er Gold Rush Chemistry: Game Details
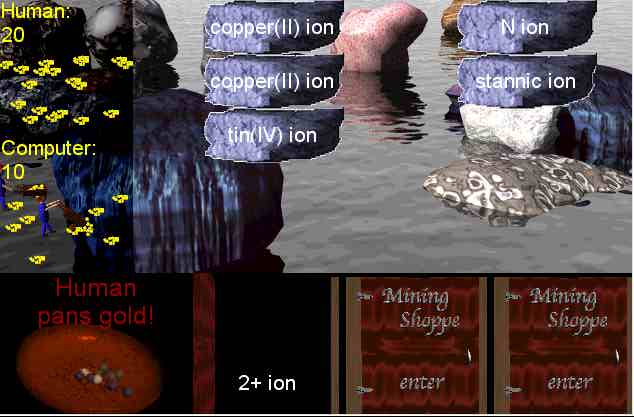
In the 49er Gold Rush chemistry game, you match Mining Tools to Rocks by matching Mining Tool terms to Rock definitions (or meanings). The 49er Gold Rush Chemistry games use the same kind of database engine as the 49er Gold Rush Language games. As in the language games, you may also add spoken definitions to correspond to the Terms you define. Definitions (or meanings) appear on the Rocks for the corresponding Terms appearing on the Mining Tools.
For example, you can choose to practice ion charge and formula - in which case the Mining Tools will bear the possible ion charges, and the Rocks will bear the names and formulae for ions. As for the language games, you can add your own Terms and Definitions or modify any existing Terms or Definitions with the Lesson and Dictionary Editor.
The program automatically keeps track of your performance during the game and automatically adjusts game difficulty settings kept within the program to match your ability. By selecting from the Game Options menu you can choose to play with or without sounds, and play an easy or hard game. At any time you can change the Terms you are learning in the game as described below using the Lesson and Dictionary Editor database engine.
Remember, this is the same editor and data engine which is used for the 49er Gold Rush Language games. If you know how to use the 49er Gold Rush Language Lesson and Dictionary Editor, you know how to use the Chemistry Lesson and Dictionary Editor.
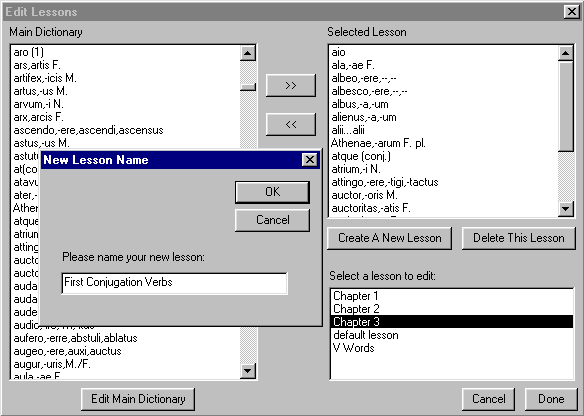
Example: Ion Charge and Formula Terms selected in Lesson and Dictionary Editor
Like in the 49er Gold Rush Language programs, you can define or redefine any Lessons (Term sets), and you can modify all existing Terms and Definitions. The basic Chemistry game comes with the following Term sets pre-defined:
You can group these built-in categories together into any lesson structure you want, and you can easily create or delete any Terms and Definitions.
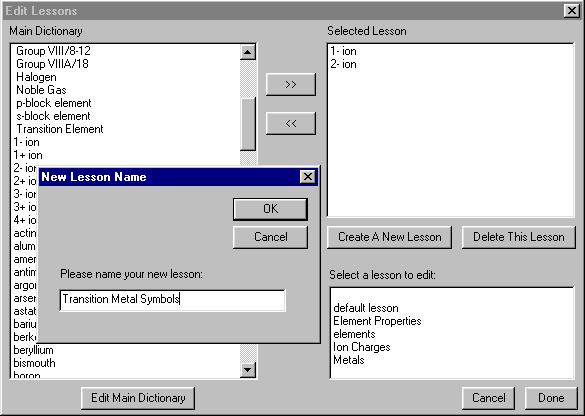
Example: Lesson Edit dialog for 49er Gold Rush Chemistry
Top . MacOS . Hungry Frog . 49er Gold Rush . Jellyfish Fun . Web Games . Freeware . Buy!
In 49er Language Vocabulary games you use the Lesson and Dictionary Editor to define lessons and also to edit the main game dictionary. If you are familiar with the 49er Gold Rush Language Lesson and Dictionary Editor, you'll know how this works. Lessons are simply subsets of the Main Dictionary. Lessons are the sets of words from which your students will choose words to practice. You can have an unlimited number of lessons, and you can add an unlimited number of words to the main dictionary from which your lessons are constructed. The number of words you can place in the main dictionary is limited only by your computer memory and speed.
We'll go through some examples of adding words to the main dictionary and editing existing words and definitions. We'll also show how to manage your lesson lists and create your lessons, and we'll show you how to have your students pick words to practice from lesson word lists.
In the following example, we'll show you how your students choose words to practice from a lesson which you (or they) have previously defined.
Students select the menu item to edit their word lists from the Game Options menu. The dialog for selecting practice words from the given lesson in play comes up. Students can then select words in the lesson list box and click the right arrow (>>) to add them to their practice list, or they can choose words in the practice list box and click the left arrow (<<) to remove them from their practice list.
At any time students can choose "Cancel" to exit the dialog without saving their changes, or they can choose "OK" to resume play using the new set or words to practice which they have just created.
NOTE: Students are not choosing words directly from the main dictionary when they select words for their practice lists. Students are choosing words from one of any number of lessons which you (or they) have set up for them. Each lesson is a subset of the main dictionary from which subset students may choose their practice words. Of course, you can decide to make a lesson equivalent to the entire main dictionary by selecting all of the main dictionary words to be in the lesson.
Top . MacOS . Hungry Frog . 49er Gold Rush . Jellyfish Fun . Web Games . Freeware . Buy!
You can very easily create an unlimited number (actually over 32,000) lessons without typing any vocabulary! You just click to make a new lesson or modify an existing lesson, and then use the mouse to move words from the main dictionary into your new or existing lesson. To get started, you click on "Change Lesson" from the "Edit Lessons" dialog (just below the "Available Lesson Words" list box and the following dialog pops up:
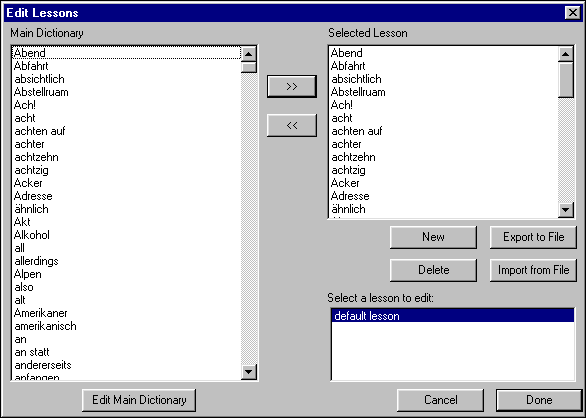
When you move words from the Main Dictionary on the left to and from the Selected Lesson on the right, you follow the same procedure as for editing the student practice list. Click the right arrow (>>) to add words to the Selected Lesson or choose words in the Selected Lesson list box and click the left arrow (<<) to remove them. You can import and export lessons as text files, and you can also read in an exported lesson as a main-dictionary (see below).
NOTE: You can import and export lessons between Jellyfish Fun, Hungry Frog and 49er Gold Rush games.
Top . MacOS . Hungry Frog . 49er Gold Rush . Jellyfish Fun . Web Games . Freeware . Buy!
To edit an existing lesson, just select it by clicking once on its name in the "Select a lesson to edit" list box at the lower right. To create a new lesson click the "Create a New Lesson" button. You can then enter the name for your new lesson and start to edit it at once. Note: You must always have at least one lesson defined, and each lesson must always have at least two vocabulary items in it. When you create a new lesson, it starts with two new vocabulary items. You probably won't want these in the lesson, so add your new words first and then remove the default New Lesson words.
Top . MacOS . Hungry Frog . 49er Gold Rush . Jellyfish Fun . Web Games . Freeware . Buy!
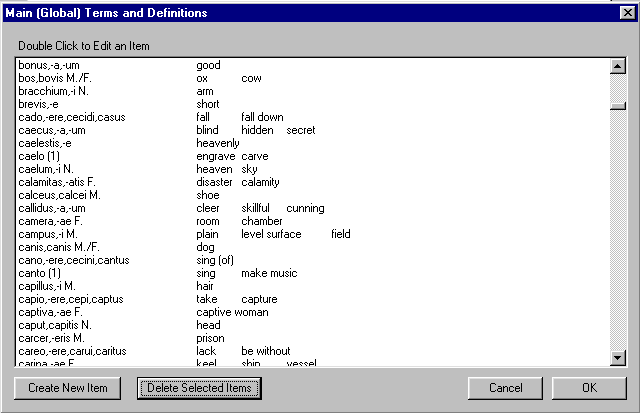
At any time from the "Edit Lessons" dialog you can choose to edit the main dictionary by clicking the "Edit Main Dictionary" button below the main dictionary list box. This will give you the "Main Terms and Definitions" dialog from which you can edit, add, or delete main dictionary items. You can also reset the main dictionary to the built-in defaults, or read in a new main dictionary from a file on disk. Just double click on any item to edit it and its definitions or the "spoken" representation of the word (the .wav file which represents that word or phrase). Select multiple items and hit the "Delete Selected Items" button to delete.
Top . MacOS . Hungry Frog . 49er Gold Rush . Jellyfish Fun . Web Games . Freeware . Buy!
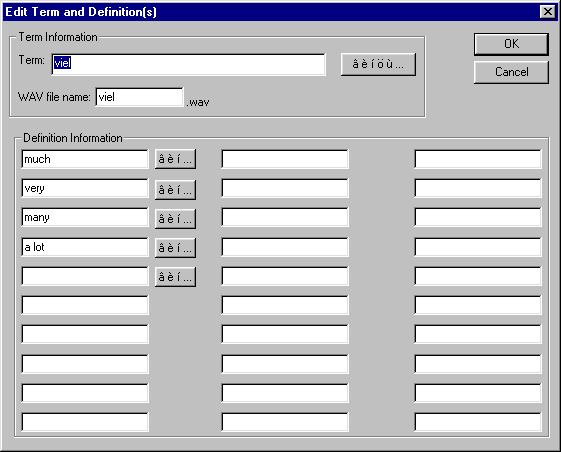
You can create a new item at any time (you can add an unlimited number of new items bound only by the limits of your computer memory and speed). When you create a new item (or edit an existing item) you will get the "Edit Term and Definitions" dialog box to edit both the term and up to 5 definitions. You can use any characters other than the '$' and '#' and "%" characters in both terms and definitions. Terms are limited to 30 characters, and definitions to 20 characters. You can freely use spaces in both terms and definitions.
In this dialog you also can specify a .wav file to represent the "spoken" form of the Term. See the section below on adding sounds to learn how to create your own sound files for Terms you add yourself which are not already included with the default main dictionary.
Top . MacOS . Hungry Frog . 49er Gold Rush . Jellyfish Fun . Web Games . Freeware . Buy!
You may edit lessons and dictionary files "off-line" outside of the programs using any text editor. Make sure you open and save the files as simple ASCII text files (.txt extension). To create a lesson file use the "Export to File" command button from the "Edit Lessons" dialog box. To export the entire dictionary, create a lesson of the full dictionary, and export that lesson to a file. To import, just use the "Import from File" command button in the "Edit Lessons" dialog. If you import a lesson file which has terms not already in the dictionary, they will be automatically added to the dictionary.
The following example uses a simple lesson file exported from the Latin game and adds an example new term and associated definitions entry into the lesson file.
NOTE: You may download these two sample lesson files (ftp://ftp.hungryfrog.com in the DEMO_WINDOWS/samplelessons directory) . The first (samplelesson.txt) is a straight export from the program of a small lesson file (Export Lesson command). The second (samplelessonedited.txt) is the same file with a new term and definition group added. We used Notepad to do the addition as explained below.
The first file was created by choosing "Export to File" command button from the "Edit Lessons" dialog box.
Here is the first file:
#
absens,-entis absens absent
ac (conj.) ac and
ala,-ae F.
ala wing
novem novem nine
octo octo eight
radix,-icis F. radix root
radish##
We then opened the file with Notepad, and placed a new entry into the file to create a new term called "new latin" with a wav file name "newwavfilename" and two definitions "new def1" and "new def2". We saved the file from Notepad as "samplelessonedited.txt" to create the new lesson.
and here is the
second
edited file:
#
new latin newwavfilename new def1 new def2
"absens,-entis"
absens absent
ac (conj.) ac and "ala,-ae F."
ala wing novem novem nine
octo octo eight
"radix,-icis F." radix root radish##
Your browser probably does not show well the [tab] characters in the above samples. The tabs are as follows:
#[tab]
new latin[tab]newwavfilename[tab]new def1[tab]new def2
absens,-entis[tab]absens[tab]absent
ac (conj.)[tab]ac[tab]and
ala,-ae F.[tab]ala[tab]wing
novem[tab]novem[tab]nine
octo[tab]octo[tab]eight
radix,-icis
F.[tab]radix[tab]root[tab]radish##
NOTE: This is very similar to the Macintosh "mini-lesson" format, and you can with a little tweaking import your Mac lessons into the Windows programs.
The generic file format is as follows for a lesson or dictionary file:
1) FIRST CHARACTER: delimiter for "end of file"
EXAMPLE FILE: #
character
2) SECOND CHARACTER: delimiter for definitions
EXAMPLE FILE: "tab"
character
3) THIRD CHARACTER: delimiter for terms
EXAMPLEFILE: "enter key"
[line feed/carriage return in Windows environment]
4) [any number of terms and definitions separated with the above
delimiters]
t0 wav0 t0d0
t1 wav1 t1d0 t1d1
.
.
.
tn
wavn tnd0 tnd1 tnd2
5) FINAL CHARACTER: end of file character (defined by first character)
NOTE: The file must be opened and saved as a simple ASCII text (*.txt) file.
You can have any number of terms and defintions. Do not place "blank fields" in the file (e.g. make sure there are no tab tab combinations, or tab return combinations) or the program will not be able to import correctly. The easiest way is to export some samples and play with them. If you do not have a wav file for a term, then it is best to use a "dummy" wave file name such as "nowavefile" for that field. The program will just say "hungry" if there is no wav file - or you can use your own recorded sounds.
Top . MacOS . Hungry Frog . 49er Gold Rush . Jellyfish Fun . Web Games . Freeware . Buy!
By default, the Hungry Frog/49er language programs will use the sound files (.wav files) supplied in the corresponding language wav directory on the Hungry Frog/49er language CD. For example, 49er Gold Rush French will look in the CD directory \sound files\french\wav for the .wav sound files for the French program.
The Hungry Frog/49er language CD must be inserted in your CD-ROM drive for the programs to access these files.
NOTE: You can copy the .wav files from your CD onto your hard drive to make the game run slightly faster. Make sure you copy them into the proper directory for the language program you are playing (see "using your own sound files" below).
In the "Edit Terms and Definitions Dialog" for a main dictionary entry, you can specify a .wav file for any and all of the Terms you define or which are in the built in dictionary. If the .wav file exists, the spoken representation of the Term will be "spoken" by the computer whenever the player selects that Term in the game (by clicking on the given frog representing that term).
NOTE: Do not include the .wav file extension in the filename you type.
The .wav files must be stored on your C drive in the "wav" directory (folder) in the "data" folder for the language game you are playing. For example, for 49er Gold Rush French the .wav files must be stored in the directory:
c:\49erGoldRush\French\data\wav
In the Latin game, to create a new spoken definition of "acer" you would:
1. Created a .wav sound file which speaks the word "acer"
2. Save the file as a .wav sound file named appropriately (e.g. you might name the file "acersound.wav").
3. Place the .wav sound file in the C drive Latin "wav" directory (e.g. c:\49erGoldRush\Latin\data\wav\).
4. Edit the definition of "acer" to include the filename "acersound" as the .wav file for that Term
Thus, whenever the player selects the "acer" mining tool, the "acersound.wav" file is "spoken" by the computer to reinforce pronunciation for that Term.
IMPORTANT NOTE: The Hungry Frog/49er software looks first in the "wav" directory on your C drive and second in the "wav" directory on the Hungry Frog/49er language CD for any .wav file you have defined in the "Edit Terms and Definitions Dialog" for a main dictionary entry. Therefore, if both these directories have files of the same name (e.g. c:\HungryFrog\Latin\data\wav\acersound.wav and l:\sound files\Latin\wav\acersound.wav), the sound file from your C drive will be played - NOT the file from your CD drive (L in the example).
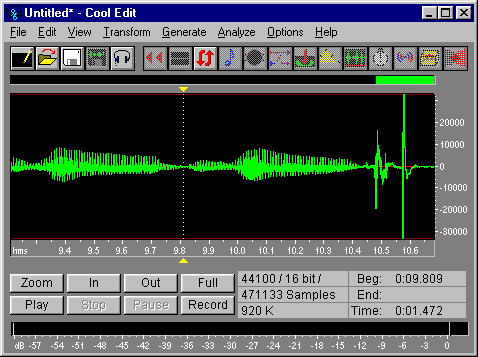
You can create or edit the .wav files in the wav directory (folder) with any sound editor which can save sound files as .wav files. The demo-version of the excellent CoolEdit program is included on your CD. Using CoolEdit makes it easy to edit or create new .wav files. If you use the CoolEdit software, please register your copy with the publisher. Information about the CoolEdit program is included with the software.
Cool Edit Screenshot
That's all you need to know to play! We hope you enjoy the game.
You may run site licensed software over a network either with or without a CD as the ".wav" sound file source. When you run without a CD, only ".wav" sound files on the C drive are played.
1) Make sure the sound CD is inserted in the server's CD-ROM drive.
2) Make sure the C drive is accessible and there is space (~ 3 MB) for autosave data files (such files exist in the C drive "data" directory for a given game).
e.g. Hungry Frog Latin requires "c:HungryFrog\Latin\data" to be accessible.
3) Run games by either accessing the corresponding .exe application directly from a shared CD via the network, or by first copying the game .exe application to the shared hard drive before running via the network.
1) Make sure the C drive is accessible and there is space (~ 3 MB) for autosave data files (such files exist in the C drive "data" directory for a given game).
e.g. Hungry Frog Latin requires "c:HungryFrog\Latin\data" to be accessible.
2) Copy the game .exe application from your CD to your shared hard drive (you will not be using the CD, so you need a copy of the .exe application on your hard drive).
3a) Copy sound files from the appropriate CD-ROM sound file directory to the corresponding "data\wav" directory on your hard drive (see "Adding and Editing Spoken Term Definitions" above). Ignore any messages (if any) indicating that sound files on the CD are not found. The game will play the ".wav" file copies on the C drive preferentially.
e.g. For Hungry Frog Latin, copy the "sound files\latin\wav" directory contents from your CD to the "c:\HungryFrog\Latin\data\wav" directory on your hard drive.
OR
3b) Copy from the CD to a logical drive accessible to the game .exe application the exact "sound files" directory structure and contents. This must be at the root level (e.g. for a hard drive volume "F" you would copy directory structure and contents to "F:\ sound files\latin\wav" from the CD "\sound files\latin\wav"). At start, the program will poll logical drives for that directory structure at the root level and will use the copy you made in lieu of the absent CD "sound files" directory contents.
4) Run the .exe game application you copied to your shared hard drive by accessing it via the network.
NOTE: Follow CD HTML manual directions for "Adding and Editing Spoken Term Definitions" to add new ".wav" sound files or replace CD-ROM ".wav" sound file resources with your own files.